How to add a comment field to MEAN.js Article example

If you happen to like the image above, and you’re thinking to yourself how cool it would look like as a sticker, take a look at a few that I made.
TL;DR
In my previous tutorial about the MEAN stack, I showed you how to get your MEAN stack up and running in less than a minute. In this tutorial I’m going to show you how to add a comment field to an existing MEAN.js Article example. You can see the finished application on http://mean.nikola-dev.com, and you can clone the source on GitHub.
I actually answered the question Adding comments to MEAN.JS articles on StackOverflow, and this posts is kind of an addition to that answer, with pictures (everyone likes pictures, right? 😉).
[toc]
Starting point
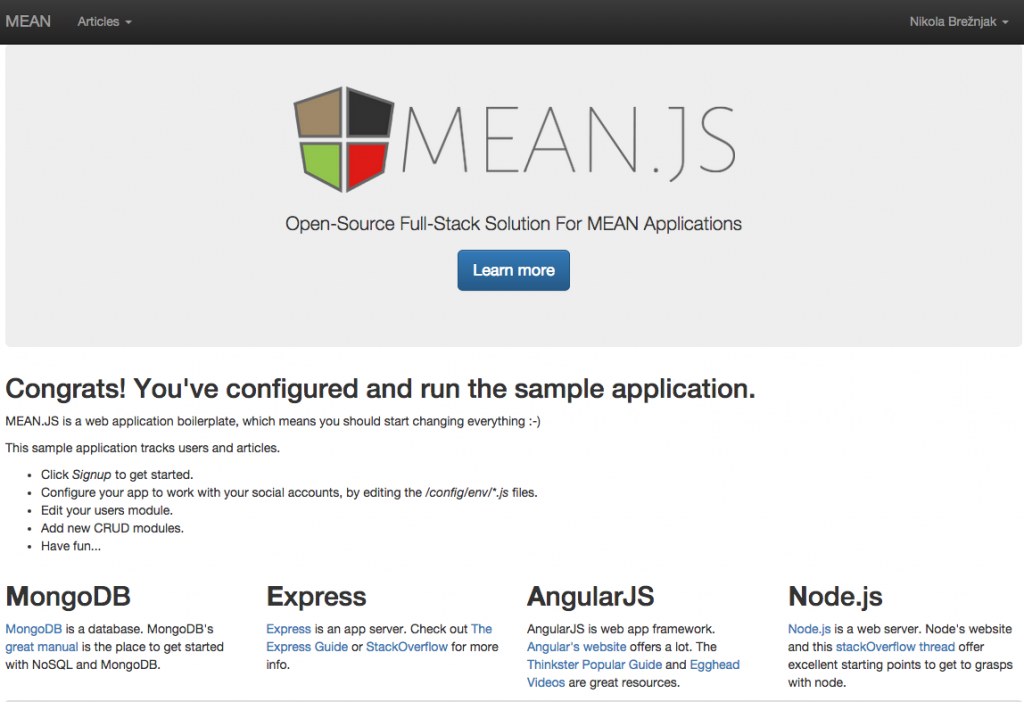
So, if you’ve followed the (ah, yet again mentioned) previous tutorial you have a running MEAN.js example on your DigitalOcean Droplet, whose front page looks like the image below if you’re logged in. You can simply register via mail (I didn’t implement any other methods like Facebook, Google, LinkedIn or GitHub for this tutorial).
Please note that yes, you can run this example locally on your computer too, but you would have to manually install the whole MEAN stack (namely MongoDB, Express.js and Node.js). If you wish to do so, you can take a look at the steps needed to do this from a rather popular tutorial How to get started on the MEAN stack. Rest of the tutorial, however, assumes you are testing this on DigitalOcean Droplet.
How to add a subdomain for Nodejs application on DigitalOcean droplet
When I was preparing this post I bought a domain just for testing purposes called nikola-dev.com and I wanted to have Node.js apps running on this VPS (behind a NGINX running as proxy, as we set it up in previous tutorial) but that they would be accessible from different subdomains (for example mean.nikola-dev.com). Below are the steps I needed to take in order to make this happen:
- Buy a domain (clearly you have done so
 )
) - Edit the Nameserver information in the admin dashboard of your domain provider (where you bought the domain) to the following three records:
ns1.digitalocean.com, ns2.digitalocean.com, ns3.digitalocean.com - Add the domain on DigitalOcean DNS settings page:
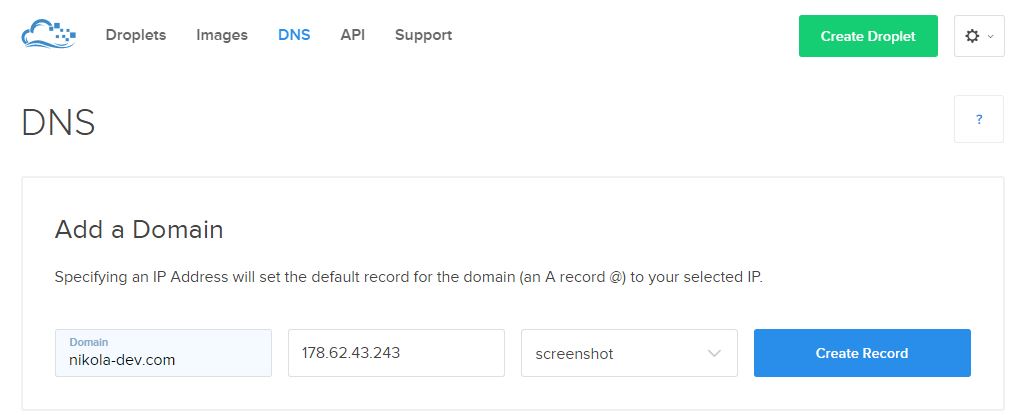
- Delete /etc/nginx/sites-enabled/default
- Create /etc/nginx/sites-available/nikola-dev.com file with the following content (this will be a simple single HTML file which will list the available test apps on this server):
server { listen 80; server_name nikola-dev.com; root /var/www/nikola-dev.com/public_html; } - Create /etc/nginx/sites-available/mean.nikola-dev.com file with the following content (this will serve the actual Node.js app that we’re building in this tutorial):
server { listen 80; server_name mean.nikola-dev.com; location / { proxy_pass http://127.0.0.1:3000; proxy_http_version 1.1; proxy_set_header Upgrade $http_upgrade; proxy_set_header Connection 'upgrade'; proxy_set_header Host $host; proxy_cache_bypass $http_upgrade; } } - Restart NGINX:
sudo service nginx restart
Adding a comment field to Article example
- In the file app/models/article.server.model.js add:
comment: {
	type: String,
	default: '',
	trim: true
},
For the reference, the whole app/models/article.server.model.js file contents should look like this:
'use strict'; /** * Module dependencies. */ var mongoose = require('mongoose'), Schema = mongoose.Schema; /** * Article Schema */ var ArticleSchema = new Schema({ created: { type: Date, default: Date.now }, title: { type: String, default: '', trim: true, required: 'Title cannot be blank' }, content: { type: String, default: '', trim: true }, user: { type: Schema.ObjectId, ref: 'User' }, comment: { type: String, default: '', trim: true } }); mongoose.model('Article', ArticleSchema); - In the file public/modules/articles/views/create-article.client.view.html add the following content before the submit button:
<div class="form-group">
	<label class="control-label" for="comment">Comment</label>
	<div class="controls">
		<textarea name="comment" data-ng-model="comment" id="comment" class="form-control" cols="30" rows="10" placeholder="Comment"></textarea>
	</div>
</div>
For the reference, the whole public/modules/articles/views/create-article.client.view.html file contents should look like this:
<section data-ng-controller="ArticlesController"> <div class="page-header"> <h1>New Article</h1> </div> <div class="col-md-12"> <form name="articleForm" class="form-horizontal" data-ng-submit="create()" novalidate> <fieldset> <div class="form-group" ng-class="{ 'has-error': articleForm.title.$dirty && articleForm.title.$invalid }"> <label class="control-label" for="title">Title</label> <div class="controls"> <input name="title" type="text" data-ng-model="title" id="title" class="form-control" placeholder="Title" required> </div> </div> <div class="form-group"> <label class="control-label" for="content">Content</label> <div class="controls"> <textarea name="content" data-ng-model="content" id="content" class="form-control" cols="30" rows="10" placeholder="Content"></textarea> </div> </div> <div class="form-group"> <label class="control-label" for="comment">Comment</label> <div class="controls"> <textarea name="comment" data-ng-model="comment" id="comment" class="form-control" cols="30" rows="10" placeholder="Comment"></textarea> </div> </div> <div class="form-group"> <input type="submit" class="btn btn-default"> </div> <div data-ng-show="error" class="text-danger"> <strong data-ng-bind="error"></strong> </div> </fieldset> </form> </div> </section> - In the file public/modules/articles/controllers/articles.client.controller.js adjust the create function to be:
var article = new Articles({
title: this.title,
content: this.content,
comment: this.comment
});
For the reference, the whole public/modules/articles/controllers/articles.client.controller.js file contents should look like this:
'use strict'; angular.module('articles').controller('ArticlesController', ['$scope', '$stateParams', '$location', 'Authentication', 'Articles', function($scope, $stateParams, $location, Authentication, Articles) { $scope.authentication = Authentication; $scope.create = function() { var article = new Articles({ title: this.title, content: this.content, comment: this.comment }); article.$save(function(response) { $location.path('articles/' + response._id); $scope.title = ''; $scope.content = ''; }, function(errorResponse) { $scope.error = errorResponse.data.message; }); }; $scope.remove = function(article) { if (article) { article.$remove(); for (var i in $scope.articles) { if ($scope.articles[i] === article) { $scope.articles.splice(i, 1); } } } else { $scope.article.$remove(function() { $location.path('articles'); }); } }; $scope.update = function() { var article = $scope.article; article.$update(function() { $location.path('articles/' + article._id); }, function(errorResponse) { $scope.error = errorResponse.data.message; }); }; $scope.find = function() { $scope.articles = Articles.query(); }; $scope.findOne = function() { $scope.article = Articles.get({ articleId: $stateParams.articleId }); }; } ]); - In the file public/modules/articles/views/view-article.client.view.html add this just before the closing section tag:
<p data-ng-bind="article.comment"></p>
For the reference, the whole public/modules/articles/views/view-article.client.view.html file contents should look like this:
<section data-ng-controller="ArticlesController" data-ng-init="findOne()"> <div class="page-header"> <h1 data-ng-bind="article.title"></h1> </div> <div class="pull-right" data-ng-show="authentication.user._id == article.user._id"> <a class="btn btn-primary" href="/#!/articles/{{article._id}}/edit"> <i class="glyphicon glyphicon-edit"></i> </a> <a class="btn btn-primary" data-ng-click="remove();"> <i class="glyphicon glyphicon-trash"></i> </a> </div> <small> <em class="text-muted"> Posted on <span data-ng-bind="article.created | date:'mediumDate'"></span> by <span data-ng-bind="article.user.displayName"></span> </em> </small> <p class="lead" data-ng-bind="article.content"></p> <p data-ng-bind="article.comment"></p> </section> - This is it, now you have a new field comment for each article:
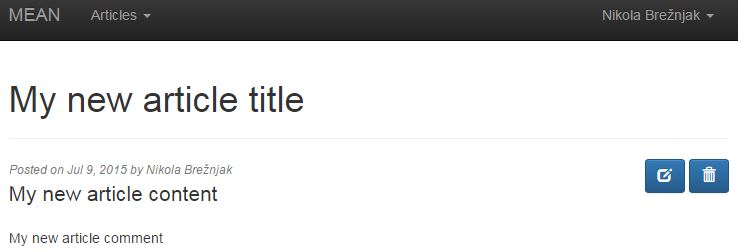
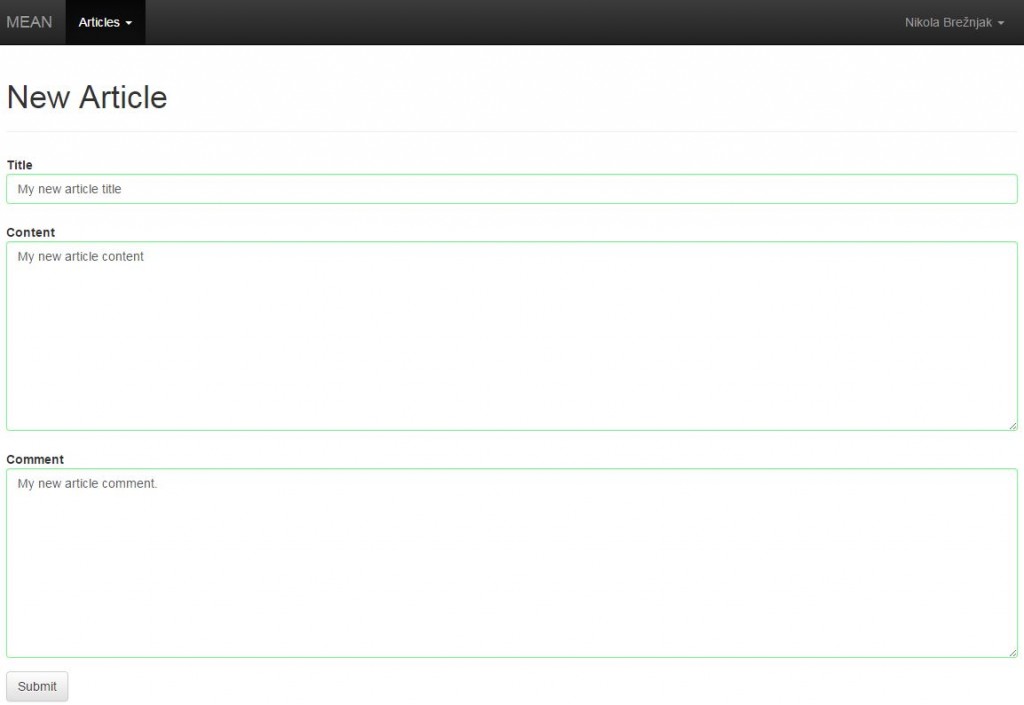 Once added, you’ll see the comment in the article list:
- What you should do now, and I hope it’s clear form these instructions here, is alter the editing part of the articles, so that they include the comment field.
Where to go from here?
This tutorial should have given you the basic understanding on how to add additional fields to the MEAN.js Article example, and you should be confident enough to starting adding your own fields and altering the example to your liking.
In the next tutorial we’ll take a look at how to add Image CRUD module to MEAN.js application with a single Yeoman command (I will update the link here once the tutorial is finished).
If you want to learn more about the MEAN stack, take a look at the blog2book Getting MEAN with MEMEs (yes, you can download it for free, though a coffee would be nice ![]() ).
).




Leave a Comment